tutorial one: rahzel
Achieving this effect:
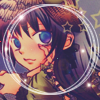
in
Adobe Photoshop Elements 6.0, but is most likely translateable.
step one:Crop your image and edit it as you like. With this image, I duplicated the base and set it to soft light 75%. You can use this step to edit anything else that might help your image look cleaner, like fixing the contrast or lightening it.
step two:Layers > New Layer. Edit > Fill. Fill with
#333366. Set this layer to exclusion and adjust the settings as you like. I made this one at 60%.
step three:It might look a little washed out, so make a new adjustment layer > hue/saturation. Up saturation by +15 or less. I've never gone beyond +20 for one layer, personally, but if you like bright and colorful icons, you might be able to make the saturation higher.
step four:New fill layer again! This time, fill it with
#ff9999. Set this layer to multiply at 20% to give it a pastel color. You can use a blue or any other shade here as well, as long as it's a pastel. And you could probably make the settings higher or lower.
step five:Hue/Saturation layer. Up the saturation by +10 and the hue by +5. Adjust the lightness as well, I went for +5.
step six:Add
this texture! Set it to screen and you're done. :D
scribbld is part of the horse.13 network
Design by Jimmy B.
Logo created by  hitsuzen.
Scribbld System Status